How To Hang Shelves on a Wall
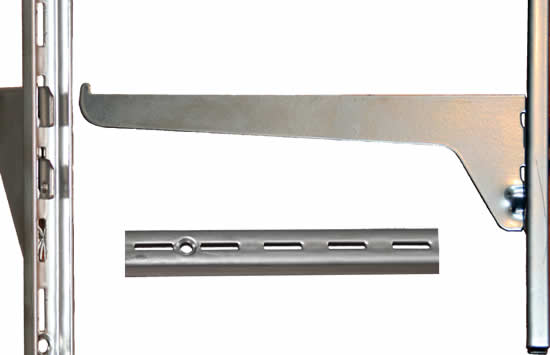
Need more space for books, photos, and decorations, but don’t have floorspace for a bookcase? “Bracket and standard” shelving is a good solution. Shelf standards are long metal channels that fasten to the wall. They have pre-cut slots that receive the matching tab from a shelf bracket which, in turn, supports the shelf. The advantages of this shelving system include its ease of installation, the ability to change the shelf height as your needs change, and its low cost.
All you’ll need to do the job right is:
- Phillips screwdriver
- Electric drill
- 1/8" diameter drill bit
- Stud sensor
- Four foot carpenter’s level
- Pencil
You’ll also need shelving materials, which may be available as a kit:
- Brackets
- Standards (height varies depending on the number of shelves used)
- Shelves
- 2-1/2" flathead wood screws or other wall anchors
1. Choose the location for your shelves. Using a stud sensor and a pencil, find and mark the edges of any wall studs in the vicinity. They should be about 16" apart, but your standards only need to use every other one for a total width of 32".
2. Choose the height of your shelves and hold one standard centered on a stud. Mark a spot on that stud where the top screw will go, then put the standard down.
3. Drill a pilot hole with the 1/8-inch bit. Then hold the standard in place and drive the wood screw until it’s snug, but not fully tightened.
4. Place your carpenter’s level against the standard and make sure it’s perfectly vertical. Mark a second spot where the bottom screw will go, drill the pilot hole and drive the bottom screw until it’s tight. Then tighten the top screw and repeat the “drill and drive” process for all other screws in that standard.
5. To make sure your shelves are level, install a bracket near the top of each standard, including the one you haven’t hung yet. Then hold the second standard in place and rest your carpenter’s level across the brackets. Adjust the height until the two standards are at the same level, then mark a spot for the top screw.
6. Repeat steps 3 and 4 to finish hanging the second standard.
7. Install brackets on the standards at suitable heights, secure the shelving on the brackets and you’re done!
Variations
For 6' shelves, install a third standard on a wall stud 32" from the second standard, then repeat steps 4 – 6 before moving onto step 7.
Things to consider
What do you want to put on your shelves and how many shelves will you need? This helps determine the height of the standards, shelf material, and mounting hardware.
If you can drill directly into wall studs, 2-1/2" wood screws will work great. If not, you’ll need anchors. These range from screws and simple plastic plugs that expand in drywall or masonry to toggle bolts and reusable “strap” toggle bolts. Try to choose the sturdiest anchor for your wall type so you have some leeway in what you put on your shelves.
Next, consider the shelf style. The most versatile shelving is “bracket and standard.” But if they don’t satisfy your needs or sense of style, braced bracket shelving and decorative bracket shelving are great alternatives.
Speaking of style, hardwoods, like oak, look good and make outstanding shelves because they support a lot of weight without sagging. Pine and other soft woods, as well as plywood, are a good compromise between cost and weight capacity. Medium-density fiberboard (MDF) is a common shelving material, but it tends to sag sooner than the others. Some shelving systems also accept pre-made wire shelves, which support as much weight as oak shelves.
|